
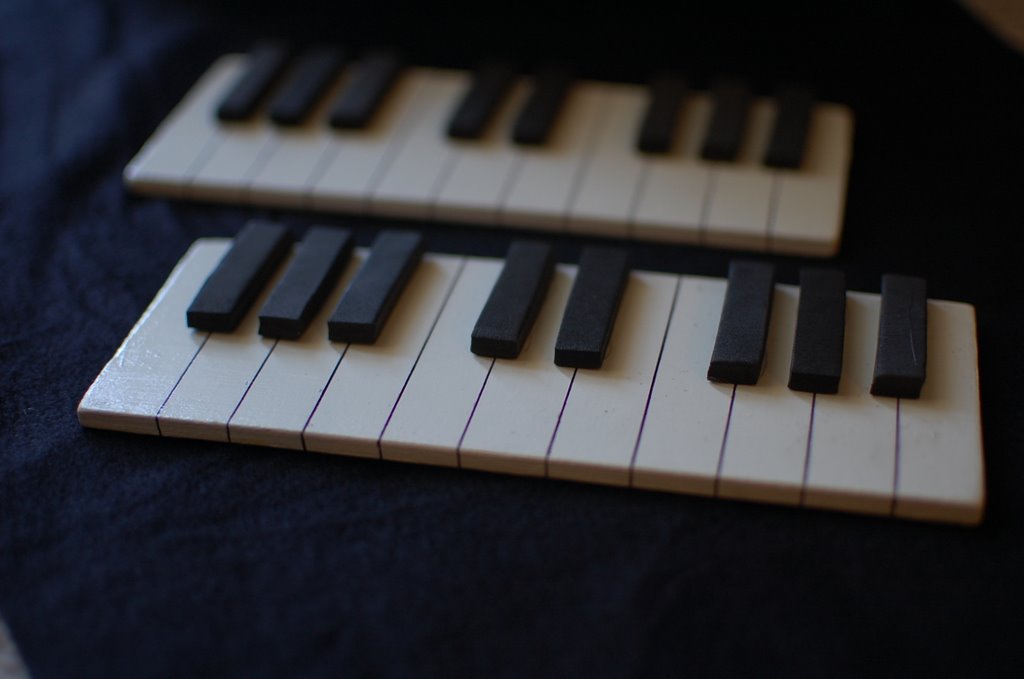
I recently decided that I wanted to own a set of silent keyboards for doing introductory piano activities with young children, and for using during group theory activities. Unfortunately, buying a set of silent plastic keyboards (view them at musicinmotion.com) can be a rather large studio expense. Of course, a cheap alternative would be to simply print a picture of a keyboard on paper. But there is something nice about the 3D features of a silent keyboard…so I decided to make my own. I got the idea from Anne Cosby Gaudet’s Piano Discoveries website, where she made similar keyboards with wood and foam.

My DIY (Do It Yourself) mini keyboards do not have true-to-life sized keys as the store-bought plastic silent keyboards have. However, I spent less on the supplies for making a set of six keyboards than it would have cost me to buy just one plastic silent keyboard! Here’s how I made my set of six keyboards:
Materials:
- 1 package of 6 wooden slats (each piece measures approx. 7 x 3 inches and 1/4 inch thick; these packages are available at craft stores for about $3).
- white acrylic paint
- small paintbrush
- an ultra fine tipped black permanent marker
- ruler
- clear lacquer spray / acrylic spray
- pair of scissors
- 1 sheet of extra thick black foam
- clear silicone adhesive/glue (less smelly than other strong glues, although other glues may work just as well.)

Instructions:
- Paint each piece of wood using 2-3 coats of white paint, as needed.
- After the paint dries, use the thin black permanent marker and a ruler to draw the lines between the white keys on each white board (to form 12 equally-sized white keys).
- Coat all sides of the wood pieces using the acrylic spray, following the directions indicated on the can.
- Cut 1cm x 4cm rectangles out of the foam sheet. You will need a total of 48 black keys for 6 keyboards. Use the clear silicone adhesive to glue the black keys to the wooden boards in groups of 2’s and 3’s.
 A few quick examples of ways to use silent keyboards:
- Introducing keyboard topography to groups of preschool / pre-piano students: Ask them to cover the black key group of two with fingers 2 and 3. Then ask them to find Middle C and other notes. They can even “play” beginner songs together in rhythm on their mini keyboards.
- A reference tool when teaching theory: Students can find and “play” chords on their mini keyboard in front of them as needed while you are teaching or they are completing a worksheet. Or, students could also use glass gems to form chords, five-finger patterns, etc.
Download a printer-friendly pdf of the instructions at the Printables > Other Resources page by scrolling down to the D’s for “DIY: Silent Mini Keyboards.”
Joy,
I love these!! I’ve always used printed paper diagrams, but you’re right – there IS something nice about the 3D version. I’m going to have to make a trip to the craft store! Thanks for sharing!
Jen Fink
These are amazing, Joy!
I’ve also always used printed diagrams, but will be making a set! Thank you!!!
It’s awesome to visit this web site and reading the views of all mates regarding this paragraph, while I am also eager of getting know-how.
OMG I love this idea not for teaching but for a centerpiece at my daughters Fresh Beat Band Party I couldn’t figure out what to do for Shout’s keyboards. Thank you you are a life saver.
Joy, do you really mean 12 white keys? I think I’m counting 11 in your picture, right?
Great idea. I have the plastic keyboards for my music class however I’m short 5 and will be making them this weekend!
That’s great! Happy crafting, Damaris!
These are SO much fun! Can you tell me which craft store you are finding these in? I have not been able to find the. Alternatively, is there another name for them that I could use to find them on Amazon?
Are you asking about the extra thick foam, Katye? Its been a few years now, but I believe I found it at Hobby Lobby.
How thick is your black foam and where can it be purchased?
I think it’s probably 5mm or 6mm thick. I recommend looking at a craft store, such as Michaels or Hobby Lobby.